|
|
|
|
File Copy and Data Migration
DiskBoss provides a large number of advanced file copy and data migration capabilities allowing one to copy vast amounts of files fast, efficiently and reliably. DiskBoss allows one to copy files including access control lists (ACLs), security attributes, ownership information, timestamps and file attributes. In addition, the user is provided with a large number of flexible file copy performance tuning and fault tolerance options allowing one to copy data at various speeds, recover failed copy operations and minimize the potential impact on running production systems. 
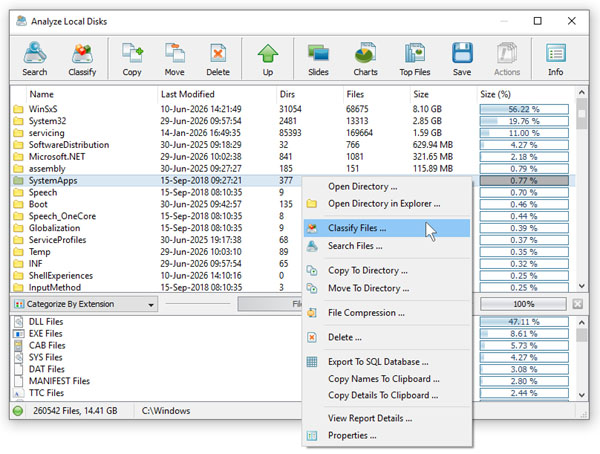
In order to start a simple file copy operation, select one or more files or directories in the DiskBoss file navigator, press the right mouse button and select the 'Copy Files To' menu item. If you wish to perform a regular copy operation using default parameters, just press the 'Copy' button and wait for the file copy operation to complete. During the file copy process, DiskBoss will display the copy progress dialog showing the total number of copied files, the total amount of copied disk space and the file copy performance. 
Copying vast amounts of data may require significant amounts of time. Sometimes, in order to perform an urgent operation, it may be required to temporary pause a long-running data migration operation. Press the 'Pause' button to temporary suspend an ongoing file copy operation and then press the 'Continue' button to resume the f operation. Press the 'Stop' button to cancel an ongoing file copy operation. 
When copying files from/to protected operating system directories or running production systems, some copy operations may fail due to one or more files locked by the operating system or other running applications. By default, DiskBoss logs non-critical errors in the operation log, which is accessible by pressing the 'Errors' button, and continues the file copy operation. In addition, DiskBoss Professional and DiskBoss Ultimate provide the user with advanced fault-tolerance and recovery options allowing one to retry failed copy operations after a designated period of time. Pre-Configured File Copy Commands Frequently used file copy and data migration operations may be pre-configured as user-defined commands, customized for user-specific needs and executed in a single mouse click using the DiskBoss main GUI application. In addition, DiskBoss Ultimate and DiskBoss Server provide a command line utility allowing one to execute user-defined file copy commands from batch files and shell scripts or schedule periodic file copy operations using a general purpose command scheduler. 
In order to pre-configure a user-defined file copy command, select the 'Commands' tool pane, press the right mouse button over the tool pane, select the 'Add New - File Copy Command' menu item and specify a command name. On the file copy command dialog, select input files or directories to be copied and specify one or more destination directories. Once finished configuring the file copy command, press the 'Save' button. Now, the pre-configured file copy command will appear in the 'Commands' tool pane. In order to execute the pre-configured file copy command, click on the command item in the 'Commands' tool pane. Advanced File Copy Options In order to open the advanced file copy options dialog, press the 'Advanced Options' button located on the file copy dialog. The file options dialog consists of the 'General' tab, 'Advanced' tab, 'Rules' tab, 'Exclude' tab, 'Options' tab and 'Miscellaneous' tab. 
The 'General' tab provides the user with the ability to optimize file copy and data migration operations for user-specific storage configurations and performance requirements. DiskBoss is optimized for multi-core/multi-CPU computers and advanced RAID storage systems and capable of copying files using multiple, parallel file copy threads. During runtime, DiskBoss analyzes copied files and applies different scheduling policies for different types of files thus maximizing the file copy performance and minimizing the copy time. In order to speed up the file copy process, use multiple copy threads when copying files between multiple physical hard disks or enterprise storage systems.
The 'Options' tab allows one to control the file copy progress bar, file attributes, timestamps, security descriptors, I/O buffering and file copy verification capabilities: 
Copying Specific File Types or Categories Sometimes, it may be required to copy specific types or categories of files according to one or more user-specific criteria. For example, for backup purposes, the user may need to copy all types of image files that were modified during the last month. DiskBoss Ultimate and DiskBoss Server provide the ability to configure one or more file matching rules allowing one to select files by the file name, directory, file type, category, file size, file attributes, creation, last modification and last access dates, user name, etc. During the file copy process, DiskBoss will evaluate all files using the specified file matching rules, copy files matching the rules and skip all other files. 
In order to add one or more file matching rules, open the file copy command dialog, press the 'Advanced Options' button, select the 'Rules' tab and press the 'Add' button. Select an appropriate rule type and specify all the required parameters. The user is provided with the ability to combine multiple different types of file matching rules allowing one to precisely select which files to copy and which files to skip from the file copy process. 
In addition to positive file matching rules allowing one to select which types of files to copy, the user is provided with negative file matching rules capable of excluding specific types of files from the file copy process. For example, in order to exclude all types of archive and backup files from the file copy process, add a file category rule, select the 'Archive and Backup Files' file category and then select the negative 'Not Categorized' rule operator. In general, almost all types of file matching rules provide positive and negative operators allowing one to easily construct sophisticated file matching rules capable of precisely select which files to copy and which files to exclude from the file copy operation. Controlling the Speed of File Copy Operations When copying a large number of files, the file copy operation make take a very considerable amount of time. If the user needs to quickly perform another operation, it may be very useful to temporary slow down the running file copy operation, perform the urgent task and then resume the file copy operation at the full speed. DiskBoss provides the ability to dynamically change the speed of running file copy operations. 
In order to change the speed of a running file copy operation, open the file copy process dialog, click on the 'Speed' combo box and select an appropriate file copy performance mode. The 'Full Speed' mode uses all the available disk speed. The 'Medium' speed mode tries to use approximately 50% of the available disk speed. The 'Low' speed mode tries to use approximately 20% of the available disk speed. 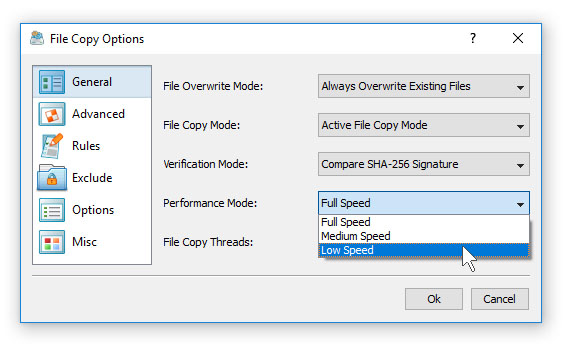
When files should be copied to/from a running production system, it may be necessary to pre-configure a file copy command to intentionally slow down all file copy operations. In order to set the default performance mode for a pre-configured file copy operation, open the file copy command dialog, press the 'Advanced Options' button, select the 'Advanced' tab and select an appropriate file copy performance mode. Excluding Subdirectories from the File Copy Process Sometimes, it may be required to exclude one or more subdirectories from the file copy process. For example, if you need to copy all files from a disk excluding one or two special directories, you may specify the whole disk as an input directory and add the directories that should be skipped to the exclude list. 
In order to add one or more directories to the exclude list, open the file copy command dialog, press the 'Advanced Options' button, select the 'Exclude' tab and press the 'Add' button. All files and subdirectories located in the specified exclude directory will be excluded from the file copy process. In addition, advanced users are provided with a number of exclude directories macro commands allowing one to exclude multiple directories using a single macro command. DiskBoss provides the following exclude directories macro commands:
For example, the exclude macro command '$CONTAINS Temporary Files' will exclude all directories with 'Temporary Files' in the full directory path and the exclude macro command '$REGEX \.(TMP|TEMP)$' will exclude directories ending with '.TMP' or '.TEMP'. Copying Files to Multiple Destination Directories DiskBoss provides the ability to copy files to a number of destination disks, directories or network shares allowing one to easily distribute files to a large number of servers or virtual machines through the network. In the simplest case, open the file copy command dialog and press the 'Add' button located on the right side of the destination directory entry. 
DiskBoss will create an additional entry allowing one to specify a second destination directory. Press the 'Add Destination Directory' button again and DiskBoss will create one more destination directory entry. Press the 'Delete' button located on the right size of a destination directory entry, to remove the destination directory. 
If the user needs to distribute files to tens or hundreds of servers or virtual machines, it may be more effective to load a list of destination directories from a text file. In order to load destination directories from a text file, press the 'Add Destination Directory' button three times until the individual directory entries will be replaced with a list of destination directories, press the right mouse button over the list of destination directories, select the 'Load' menu item and specify the name of the text file to load destination directories from. The text file should include a list of destination directories in the plain text format with one directory per line. Schedule Periodic File Copy Operations In addition to the ability to perform manual file copy operations using the DiskBoss GUI application, the user is provided with a server-based product version, named DiskBoss Server, which runs in the background as a service and allows one to schedule periodic file copy operations. First of all, start the DiskBoss Server client GUI application, press the 'Add' button located on the main toolbar and select the 'Add - File Copy Command' menu item. 
Enter a command name, specify a number of input files or directories that should be copied, specify one or more destination directories and press the 'Save' button. Now, press the 'Jobs' button located on the main toolbar and press the 'Add' button to add a new periodic job. The periodic job dialog allows one to define one or more periodic schedules and one or more pre-configured analysis or file management commands to execute. 
Press the 'Add' button located on the right side of the top view to add a periodic job trigger. The user is provided with a number of hourly, daily and weekly periodic scheduling options allowing one to easily define the desired schedule. Once finished configuring periodic job triggers, press the 'Add Command' button located on the right side of the bottom view to add one or more pre-configured DiskBoss commands to be executed according to the specified schedule. DiskBoss allows one to execute multiple file copy commands in each periodic job and provides the ability to specify how to execute these commands: sequentially or in parallel. Monitor Disk Changes and Copy Files in Real-Time DiskBoss Server provides the ability to monitor a disk or directory and automatically copy newly created files to one or more destination directories. The user can just drag-and-drop files into the monitored directory and all files will be automatically copied to the required destination directories. In order to setup a disk change monitoring command, open the DiskBoss Server client GUI application, press the 'Add' button located on the main toolbar and select the 'Disk Change Monitoring Command' menu item. 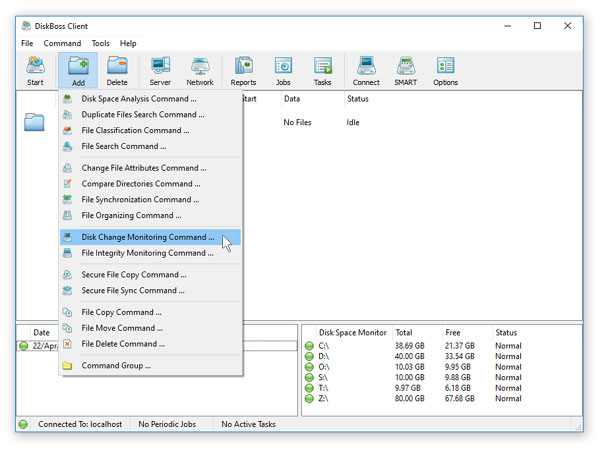
Enter a command name and specify a disk or directory to monitor. On the disk monitor options dialog, select the 'Actions' tab, enable disk monitoring actions and specify the number of disk changes to trigger the actions. Now, enable the 'Execute DiskBoss Command' action and select the pre-configured file copy command to be executed when the user-specified number of disk changes are detected. 
Once finished configuring the disk change monitoring command, select the command in the commands view, press the right mouse button and select the 'Start Command' menu item. DiskBoss Server will monitor changes in the specified disk and execute the selected file copy command. The DiskBoss client GUI application may be closed and the DiskBoss service will continue to run in the background, monitor the specified disk or directory and execute the selected file copy command fully automatically. Copying Files Using the DiskBoss Command Line Utility In addition to the DiskBoss GUI application, DiskBoss Ultimate and DiskBoss Server provide a command line utility allowing one to perform file copy operations from batch files and shell scripts. The DiskBoss command line utility is located in the '<ProductDir>/bin' directory. Command Line Syntax: diskboss -copy –dir <Source 1> [ ... Source X ] –dest <Destination> [ Options ] diskboss -move –dir <Source 1> [ ... Source X ] –dest <Destination> [ Options ] diskboss -execute <Pre-Configured File Copy Command> Parameters: –dir <Source> -dest <Destination Directory> At least one source file or directory and a destination directory should be specified. In order to ensure proper parsing of command line arguments, directories and file names containing space characters should be double quoted. Options: -verify This parameter instructs DiskBoss to verify each file after copy. -streams <StreamCount> This parameter specifies the number of simultaneous file copy streams. -file_scanner <sequential or parallel> This parameter specifies the file scanning mode: sequential or parallel. Use the parallel scanning mode when copying multiple input directories located on a RAID array or multiple disk drives. -file_delay <delay in milliseconds> This parameter instructs the DiskBoss' copy engine to insert a delay of X ms. after each copied file. Use this option when you need to slowly copy data to or from a busy production system in order to minimize the potential performance degradation. -block_delay <delay in milliseconds> This parameter instructs the DiskBoss' copy engine to insert a delay of X ms. after each data block. Use this option when you need to slowly copy data to or from a busy production system in order to minimize the potential performance degradation. -retry_count <RetryCount> This parameter instructs the DiskBoss' copy engine to retry failed copy operations. Use this option when copying data over an unreliable network connection or when some source files may be locked during the copy operation. -retry_delay <retry delay in seconds> This parameter specifies the time delay between copy retry operations. -max_pending_task <MaxPendingTask> This parameter specifies the maximum number of pending retry operations. -overwrite_mode <OverwriteMode> This parameter specifies the file overwrite mode: overwrite, overwrite_if_newer or skip. -copy_dacl This parameter instructs to copy files' access control lists (DACL). -copy_sacl This parameter instructs to copy files' security control lists (SACL). -copy_owner This parameter instructs to copy files' user/group information. -copy_time This parameter instructs to copy files' last access/write/creation times. -copy_attr This parameter instructs to copy files' read-only/system/hidden attributes. -copy_all This parameter instructs to copy files' ACL, ownership, times and attributes. -v This command shows the product’s major version, minor version, revision and build date. -help This command shows the command line usage information.
|
DiskBoss News
|